How to Build a Deck

How to Build a Deck (Without Losing Your Mind, or your weekends)
You know that dream deck you have in mind?
The one where you’re sipping something cold on a breezy summer evening, feet up on your own back deck, maybe some music playing in the background? That scene sticks for a reason. A good deck is a personal escape. A place to relax, survey a finished yard, or grill a good meal.
But here’s the thing: that vision turns real with a bit of planning, a decent toolbox, and the willingness to sweat through a weekend (or three). Building your own deck might sound like a project for pros, but if you’ve got patience and a decent drill, you’re already halfway there.
Let’s walk through what it takes to build a deck. From “where do I even start” to “let’s break this thing in with a cookout.”
- 1 How to Build a Deck (Without Losing Your Mind, or your weekends)
- 2 Start With the Big Questions
- 3 Deck Surface Options
- 4 Planning Your Deck Build
- 5 StoneDeks Deck Building Resources
- 6 Building a Deck
- 7 Prep your deck for stone surfaces
- 8 Cost of Building a Deck
- 9 When to Call a Pro (And Why That’s Not “Giving Up”)
Why Build It Yourself?
There’s no shortage of deck contractors. So why DIY?
For one, cost. Labor isn’t cheap, and decking square footage adds up fast. But there’s more than money at stake. When you build it yourself, the end result isn’t just functional—it’s personal. You remember which beam gave you trouble. You know why that stair is exactly 36 inches wide (because 35 felt cramped). You get a kind of pride that doesn’t come in prefab form.
That said, this isn’t a quick weekend escape room project. If you’re just hoping to save money without putting in the time to learn what you’re doing, it’s probably not worth it.
But if you’re in it for the long haul—and want something solid, safe, and satisfying—keep reading.
If not, here’s why you might want to go with a deck building pro:
Start With the Big Questions
Before you even sketch a line or browse Home Depot, step back and think of your deck ideas. What’s the deck actually for?
Purpose
Are you building a grilling station or an outdoor kitchen? A sun-drenched lounge? A full outdoor dining space? A poolside retreat? The answer changes everything—from the size and structure to the materials you’ll need.
Placement
Will this be a single or a multi-level deck? A patio space, or a deck (or, what’s the difference between a deck or Patio? ) How many stairs will you need to place? How will you configure each level, adapt to the landscaping, or will you need retaining walls? Elevated surfaces add exciting possibilities for both form and function.
Space
How much space do you really have? Not just in your yard, but in your life. Don’t plan for something you can’t maintain. Big decks look great on Pinterest, but they age fast when they’re neglected or half-used.
Position
And think about where the deck will sit with sun exposure, drainage, privacy, and the slope of your yard. You don’t want to discover after week three that your “morning coffee deck” is shaded until noon.
Here’s what you’ll want to nail down:
- Purpose and function
- Size and layout (scale it to your home, not your ambition)
- Orientation (sunlight, prevailing winds, neighbors)
- Ground conditions (flat, sloped, rocky, etc.)
- Connection to house (or free-standing?)
And then there’s material. Which brings us to…
Deck Surface Options
Let’s talk lumber. Or not. Because not all decks are wood anymore.
1. Pressure-Treated Lumber
This is the go-to for many DIYers. It’s affordable and easy to find. It’s also chemically treated to resist rot and insects, which is great—until it splits, warps, or turns a weird greenish hue if you skip sealing.
2. Cedar or Redwood
More beautiful. Naturally rot-resistant. But more expensive. And soft—easy to work with, but dents and dings come fast.
3. Composites (like Trex, TimberTech)
Low maintenance, longer lifespan. You’ll pay more upfront, but save time on upkeep. Some brands even offer warranties that outlive your interest in yard work. Just be careful on sunny days—composite can get hot.
And don’t forget the fasteners. Seriously. You can spend hours planning the perfect layout, but cheap screws or wrong nails will ruin it. Stainless steel or coated deck screws. Always.
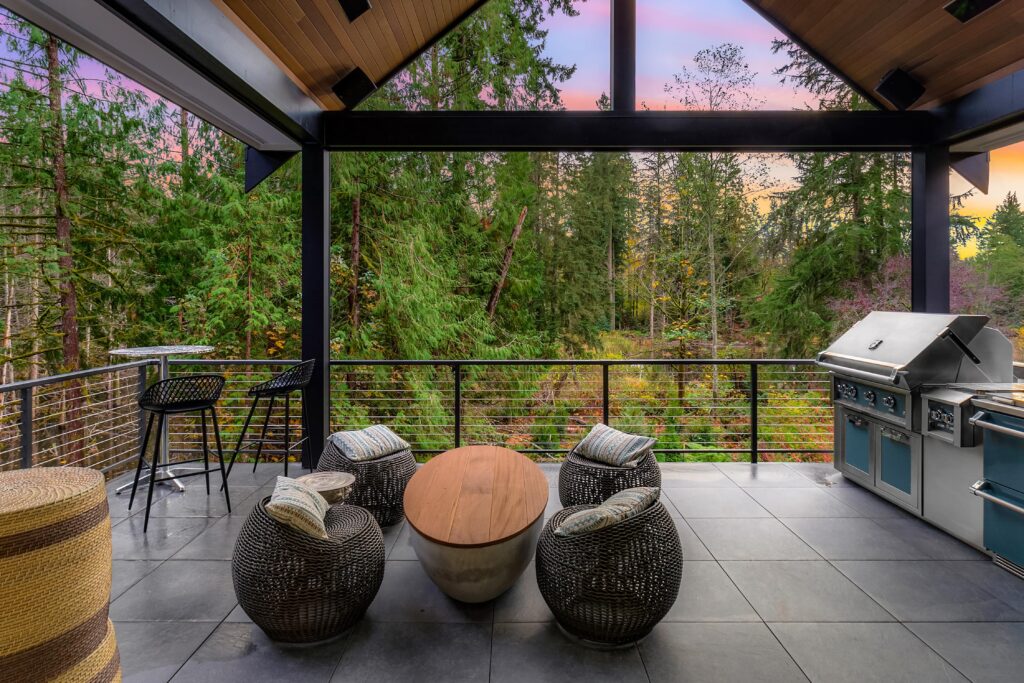
4. Stone (Travertine Pavers, Porcelain Tiles, Brick and more!)
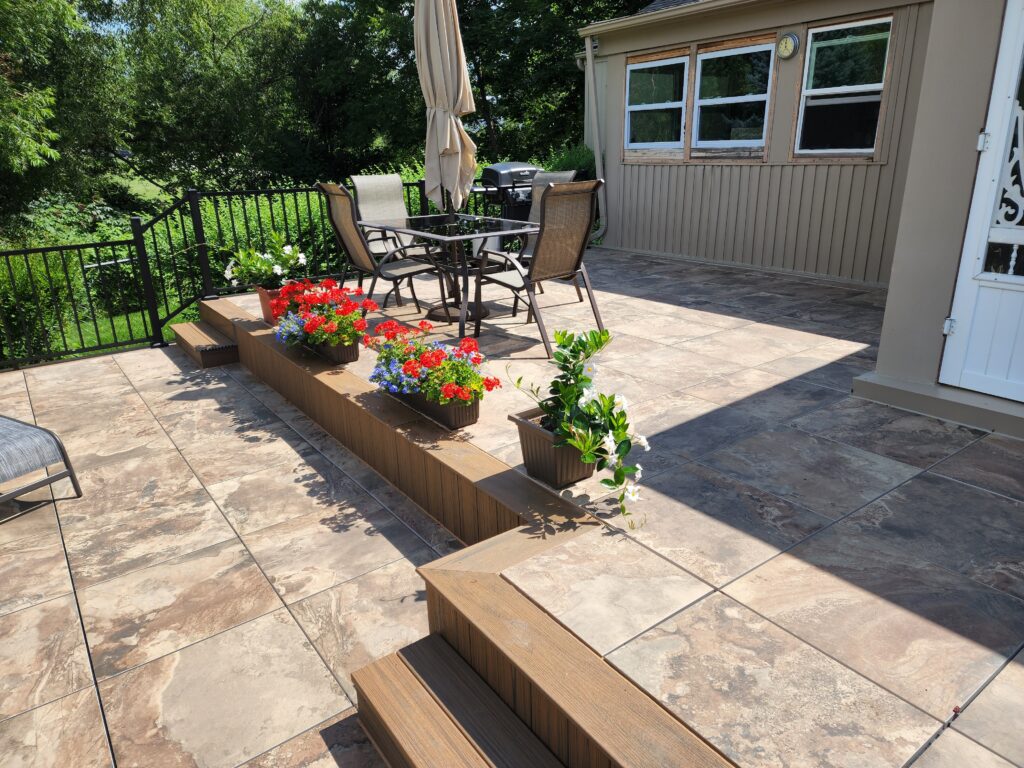
The StoneDeks system provides added support that enables you to add any kind of stone, porcelain, paver surface. Extend your living space onto the deck – and even into your hardscape!
The StoneDeks system also answers the problem of weather and maintenance. By allowing water to drain, a proper installation won’t crank, lift, or budge, giving you a maintenance-free deck that you’ll never have to sand, strip, or replace.
Explore deck material options:
Choosing Stone v Composite Decks
Using Bluestone or Flagstone on your deck – what’s the difference?
Planning Your Deck Build
Permits and Code: Yes, You Need Them
This is the least fun part. It’s also the one that keeps your project legal and your homeowners insurance valid.
Decks have to meet code. Period. That means load limits, railing height, stair width, and how far apart your joists are. Don’t wing it.
Most cities require a permit for anything attached to your house or above a certain height. Some even inspect post-hole depth and footing structure before you pour concrete.
And yes: call before you dig. Local utilities will mark lines for free. Ignoring that is asking for a flooded basement—or worse.
If this section made your eyes glaze over, good. That’s your brain telling you it matters.
Sketch Your Plan
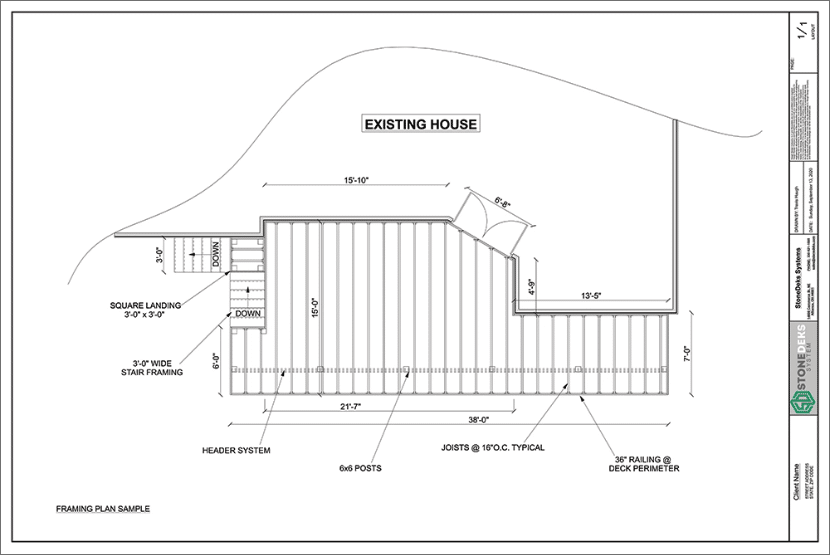
A decent plan saves you from stupid mistakes. Sketch it out. Use graph paper, a deck design app, or even just cardboard cutouts on your lawn.
Figure out:
- Joist spacing (typically 16 inches on center)
- Beam span limits
- Post and footing locations
- How the ledger attaches to the house (hint: flashing matters)
You’d be shocked how many weekend warriors frame a deck that looks square… until they try to install the decking and realize nothing lines up. Use a framing square. Check diagonals. Keep a level close like it’s your phone.
StoneDeks Deck Building Resources

Building a Deck
Set the Footings and Posts
This part matters more than anything. Uneven footings mean an uneven frame. Uneven frame means warping, gaps, and frustration down the line.
- Dig below frost line (check local code)
- Use sonotubes and concrete
- Set post anchors while the mix is still wet
- Double check everything before it sets—seriously
Attach the Ledger (If Connected to House)
Lag bolts. Flashing. Gaps. Water is your enemy here. Flashing tape helps. So does a sloped spacer behind the board to allow drainage.
Build the Frame
- Attach beams to posts (carriage bolts or heavy-duty hangers)
- Run joists across the beams using joist hangers
- Toe-nail or screw where needed
- Square and level before tightening everything down
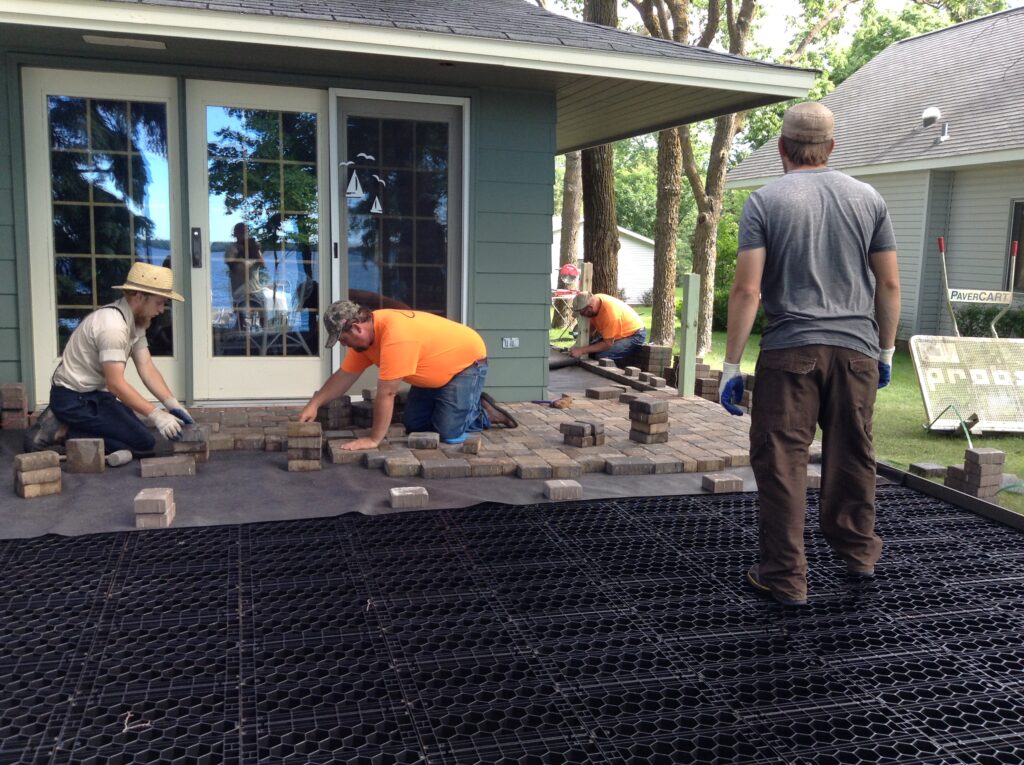
Prep your deck for stone surfaces
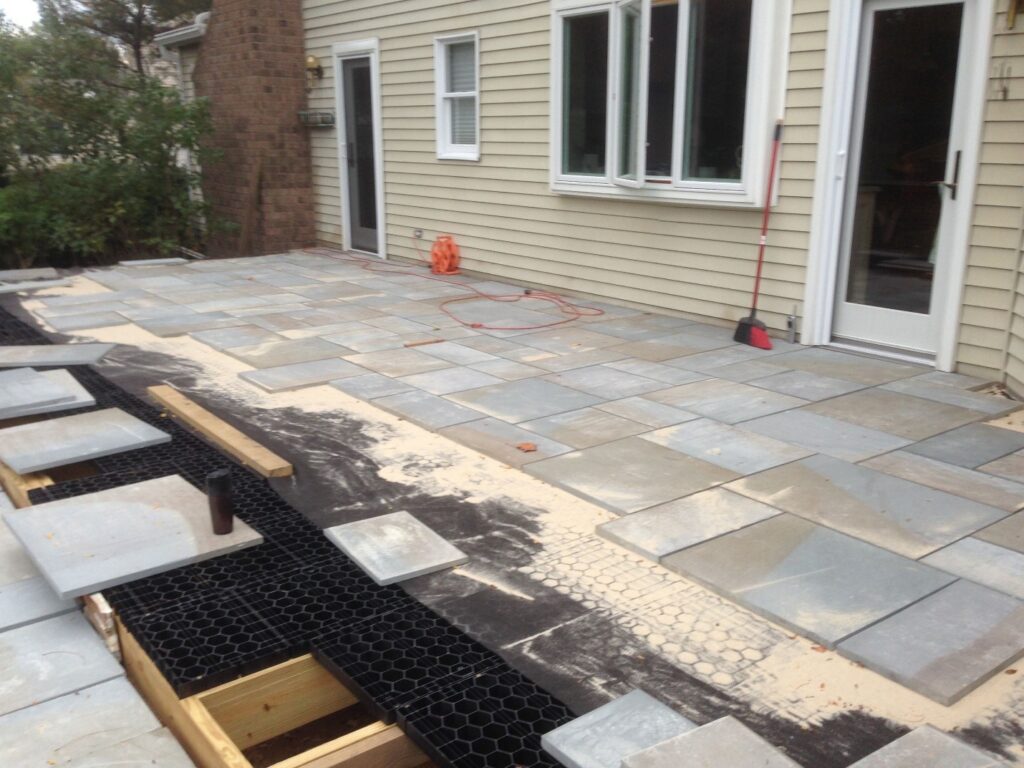
If you choose to use stone, then you’ll need the StoneDeks System SilcaGrates – the heart of the structural support. The SilcaGrates are 1.5 inches thick and should be placed on a standard 16-inch space decking base. A few key points to remember:
- Joist Alignment: Each grate should be centered on the joists for optimal support, with each joist being at least 2×8.
- Grate Orientation: The side with the strip should face downwards. For enhanced strength and durability, alternate between half and full grates.
Once the Silca grates are in place, it’s time to install the decking materials. This involves steps like installing a geotextile or landscape blanket, like our SilcaMat, if using sand, placing top materials like sandstone blocks, red brick pavers, and gray pavers, and utilizing a diamond blade for cutting stone and tile.
Looking to see and not just read? Here is our video guide:
Stairs, Railings, and Skirt Boards
Don’t skimp here. This is where a solid DIY deck turns into a backyard gem—or a janky liability.
- Stairs need solid stringers (cut cleanly, supported well)
- Railing height usually needs to be 36″ minimum
- Baluster gaps: less than 4″ (so kids don’t slip through)
- Skirts and fascia boards cover the ugly parts and add polish
This is also a good time to install post caps, lighting, or built-in planters if you’re feeling ambitious.
Weatherproofing and Maintenance
Even if you used composite decking, your frame is probably pressure-treated wood. That means moisture is still a threat.
For wood decks:
- Wait 1–3 months before staining/sealing
- Use a semi-transparent stain for balance of color and grain
- Re-seal every 1–2 years
For composite:
- Hose it off regularly
- Spot-clean mold or mildew early
- Avoid dragging furniture across it
For stone:
- Hose it off as needed
- That’s it.
Cost of Building a Deck
This part’s fluid, depending on materials, size, and whether you already own a circular saw.
Rough numbers:
- Pressure-treated wood deck: $15–$25 per sq. ft.
- Stone: $50 – $100 (Depending on stone choice)
- Cedar: $25–$35
- Composite: $30–$60
- Tool rental: $100–$300
- Permits: $100–$500
What kills your budget? Brackets, bolts, sealant, stain, disposal fees, and that second trip to the store when you forgot something.
Final Thoughts: Are You Still Thinking About That Iced Tea?
Building a deck isn’t magic. It’s just a stack of small, deliberate steps. Get one right, then the next. Don’t rush. Don’t fake it. Measure. Adjust. Repeat.
Before you know it, you’ll be sitting on something you built with your own hands—something sturdy, good-looking, and completely yours.
You earned that cold drink. Now go get it.
When to Call a Pro (And Why That’s Not “Giving Up”)
Let’s get one thing straight: calling in a professional deck builder isn’t admitting defeat. It’s admitting you’ve got a life, a job, maybe a family, and limited time to learn load-bearing codes and joist span tables. There’s no shame in that.
So how do you know it’s time to step back and let a contractor handle it?
Start with a Brutally Honest Self-Evaluation
Ask yourself:
- Have I ever used a circular saw? Can I cut a straight line under pressure?
- Do I actually have the time to commit weekends (plural) to this project?
- Can I read a tape measure without squinting at 16ths and faking confidence?
- Do I know how to safely mix and pour concrete footings?
- Do I want to learn about zoning codes, structural load requirements, and fastener corrosion ratings?
- Would I rather spend that time doing literally anything else?
If you answered “no,” “maybe,” or “ugh” to most of those, that’s your answer. It’s not that you can’t do it. It’s whether it’s worth your time and effort to try.
Five Legit Reasons to Hire a Deck Builder
1. They Know Code So You Don’t Have To.
Professionals build to code by default. They’ve done this a hundred times, across cities with different rules, and they won’t forget the one detail that could hold up your inspection.
2. They Have the Tools and the Crew.
You’d be amazed how fast a framing crew can set posts, build out beams, and deck a platform. What might take you three weekends might take them three days—with better precision and fewer sore backs.
3. They See Problems Before You Do.
Is your soil too soft for standard footings? Does your siding need to be modified to attach the ledger? A good contractor spots these early—before they cost you extra materials or a total redesign.
4. They Guarantee the Work.
A warranty isn’t just a piece of paper. If your stairs shift or a board warps within a year, a pro will fix it. You, on the other hand, will be back at the hardware store staring at the lumber aisle again.
5. The Finish Is Just… Better.
Even if you frame it well, railings, stair cuts, trim, and fascia work require skill and attention to detail. A pro knows how to make it look clean and intentional—not just “good enough for the backyard.”
What to Expect When You Hire One
Good deck contractors don’t just show up with a truck and start drilling. They’ll help:
- Assess your yard and soil conditions
- Create or refine your design
- Handle permitting and inspections
- Order and deliver materials
- Schedule everything (crew, concrete, cleanup)
- Build it clean, square, and fast
Yes, it’ll cost more than doing it yourself. But if the trade-off is less stress, better results, and time back in your day, it might be the smarter choice.
Here’s where to Find a Good Deck Builder/Contractor who has experience building and finishing a StoneDeks deck.
Look for:
- License and insurance. Non-negotiable.
- References and reviews. Ask for photos of past work and contact details for past clients.
- Clear contract. With timeline, materials, total cost, payment schedule, and warranty terms.
Avoid contractors who demand large upfront payments or shrug off the need for permits. That’s a red flag, not a shortcut.
